Managing conference rooms, private offices, and shared spaces across a property portfolio is harder than it looks. Double bookings, manual spreadsheets, and pricing confusion cost operators hours every week. Estately is an all-in-one booking software for real estate that eliminates this friction by bringing every reservation into one unified, automated platform.
This guide is a complete walkthrough of the Estately Booking Module, from initial configuration in the Settings tab all the way to managing a live Booking Dashboard. By the end, you will know exactly how to set up Charge Periods, create and track bookings, and use the platform's three dashboard views to run a tight operation every day.
Whether you run a single coworking floor or a multi-property portfolio, this Estately booking module guide will help you go live with confidence.
Step 1: Configure Charge Periods in Settings
Before you can set up pricing for your bookings, you need to define your Charge Periods. These are the standard units of time Estately uses to calculate what a customer owes.
Fortunately, Estately has streamlined this process. Instead of forcing you to manually build time blocks from scratch, we have pre-configured the most common durations into a simple, easy-to-use toggle system.
Here is how you can set up your Charge Periods in just a few clicks.
Access Your Settings: Log into your Estately dashboard and navigate to the left-hand sidebar. Click on the Settings menu to expand your configuration options.
- Navigate to Charge Periods: From the expanded Settings list, select Charge Period.
- Review the Default Options: On this screen, you will see four standard, pre-built time blocks:
- Hourly (Perfect for meeting rooms and hot desks)
- Daily (Ideal for pop-up shops or day passes)
- Weekly (Great for short-term events or kiosks)
- Monthly (The standard for private offices and long-term retail leases)
- Assign to Business: Look at the column labeled Assign to Business. Next to each time block, you will see a toggle switch. Simply click the toggle to turn it ON (the switch will turn green with an "Active" status) for any period that applies to your operations.
The Estately Best Practice
Pro Tip: Not sure which ones you will need right now? Toggle all of them ON. In most cases, property managers activate all four options. Activating them does not force you to use them immediately, but it gives you maximum flexibility later on when you are attaching specific prices to different types of workspaces or units.
Step 2: Set Up Prices for Each Unit
Once your Charge Periods are active, you can attach monetary values to those time blocks to automate your billing—whether for hourly hot desks or monthly apartment leases.
Prerequisite: Ensure your Charge Periods are toggled ON in your business settings before starting.
How to Create a Price
.png)
- Navigate to Prices: Go to the left sidebar, click Settings, and select Prices.
- Add a Rule: Click the green + Create Price button in the top right corner.
- Fill in the Details:
- Name & Description: Use a clear identifier (e.g., "Standard Conference Room - Hourly").
- Property & Units: Select the applicable property and unit(s) from the dropdowns.
- Charge Period: Choose the appropriate time block (Hourly, Daily, Weekly, or Monthly).
- Price: Enter the flat rate based on your company policy.
- Save: Your new pricing rule is instantly active and ready for bookings!
Advanced Strategies: Stacked Rules & Zero-Dollar Pricing
Estately’s pricing module isn’t just for static rates; it is built to handle complex, real-world property management scenarios.
1. The Coworking Scenario: $0 Pricing for Internal Members If you run a coworking space, you likely have internal members whose monthly plans include free access to certain amenities (like 5 free hours of meeting room time).
- How to handle it: You can create a price rule for exactly $0.
- Why this matters: Even though the member isn't paying extra, they still need to book the room and go through the checkout process. Generating this $0 invoice ensures the unit is officially marked as "Occupied" on your dashboard, preventing embarrassing double-bookings, while keeping your members happy and barrier-free.
2. The Apartment Scenario: Stacked & Seasonal Pricing You aren't limited to just one price per unit. You can stack multiple pricing rules on top of each other.
- How it works: Estately automatically applies the most specific rule at the time of booking, eliminating manual calculations.
- Why this matters: If you manage short-term rentals or apartments, you can automate seasonal pricing. For example, you can set a premium "Holiday Rate" that automatically overrides your standard "Monthly Rate" during peak tourist seasons, and then seamlessly reverts back once the period ends.
Step 3: Navigating the Booking Dashboard
.png)
With settings configured, the Booking Dashboard becomes your daily command center. It opens in List View by default a sortable table of all reservations across your property portfolio. Each row shows six key columns:
• Property Name — the property the booked unit belongs to (e.g., Acme Coworking Fairways)
• Unit Name — the specific unit reserved (e.g., Conference Room 1, Private Office 2)
• Status — a color-coded badge showing the booking's current state (e.g., pendi ng, Confirmed, Cancelled)
• Booking Period — the precise start and end datetime driving the billing calculation
• Customer — the linked customer profile, clickable for full booking history
• Created At — the timestamp when the booking was entered into the system
Above the table, you have a Search bar for instant lookup by customer or unit name, a Filters button to narrow results by status or date range, an Export button for reporting, and the green + Create Booking button in the top-right corner for creating a new booking.
Step 4: Understanding the Booking Status Lifecycle
Every booking in the property booking ecosystem moves through a clear status workflow. Understanding these three states is essential for your team to respond correctly.
Status Meaning & Action Required
Pending: Submitted but not yet reviewed. Review pending bookings daily to avoid customer uncertainty and scheduling conflicts. This is the default state for all new bookings.
Confirmed: Approved and officially reserved. Billing can be triggered from this state. The unit is blocked in the calendar for the full booking period.
Cancelled : Voided by staff or the customer. The booking record is retained for audit and reporting purposes while the unit is freed for new reservations.
Step 5: Using All Three Dashboard Views
Estately's Booking Dashboard offers three views, each optimized for a different management scenario.
List View
The default tabular view. Best for processing pending bookings, auditing records by creation date, searching by customer name, and exporting data for monthly reconciliation. Start here every morning.
.png)
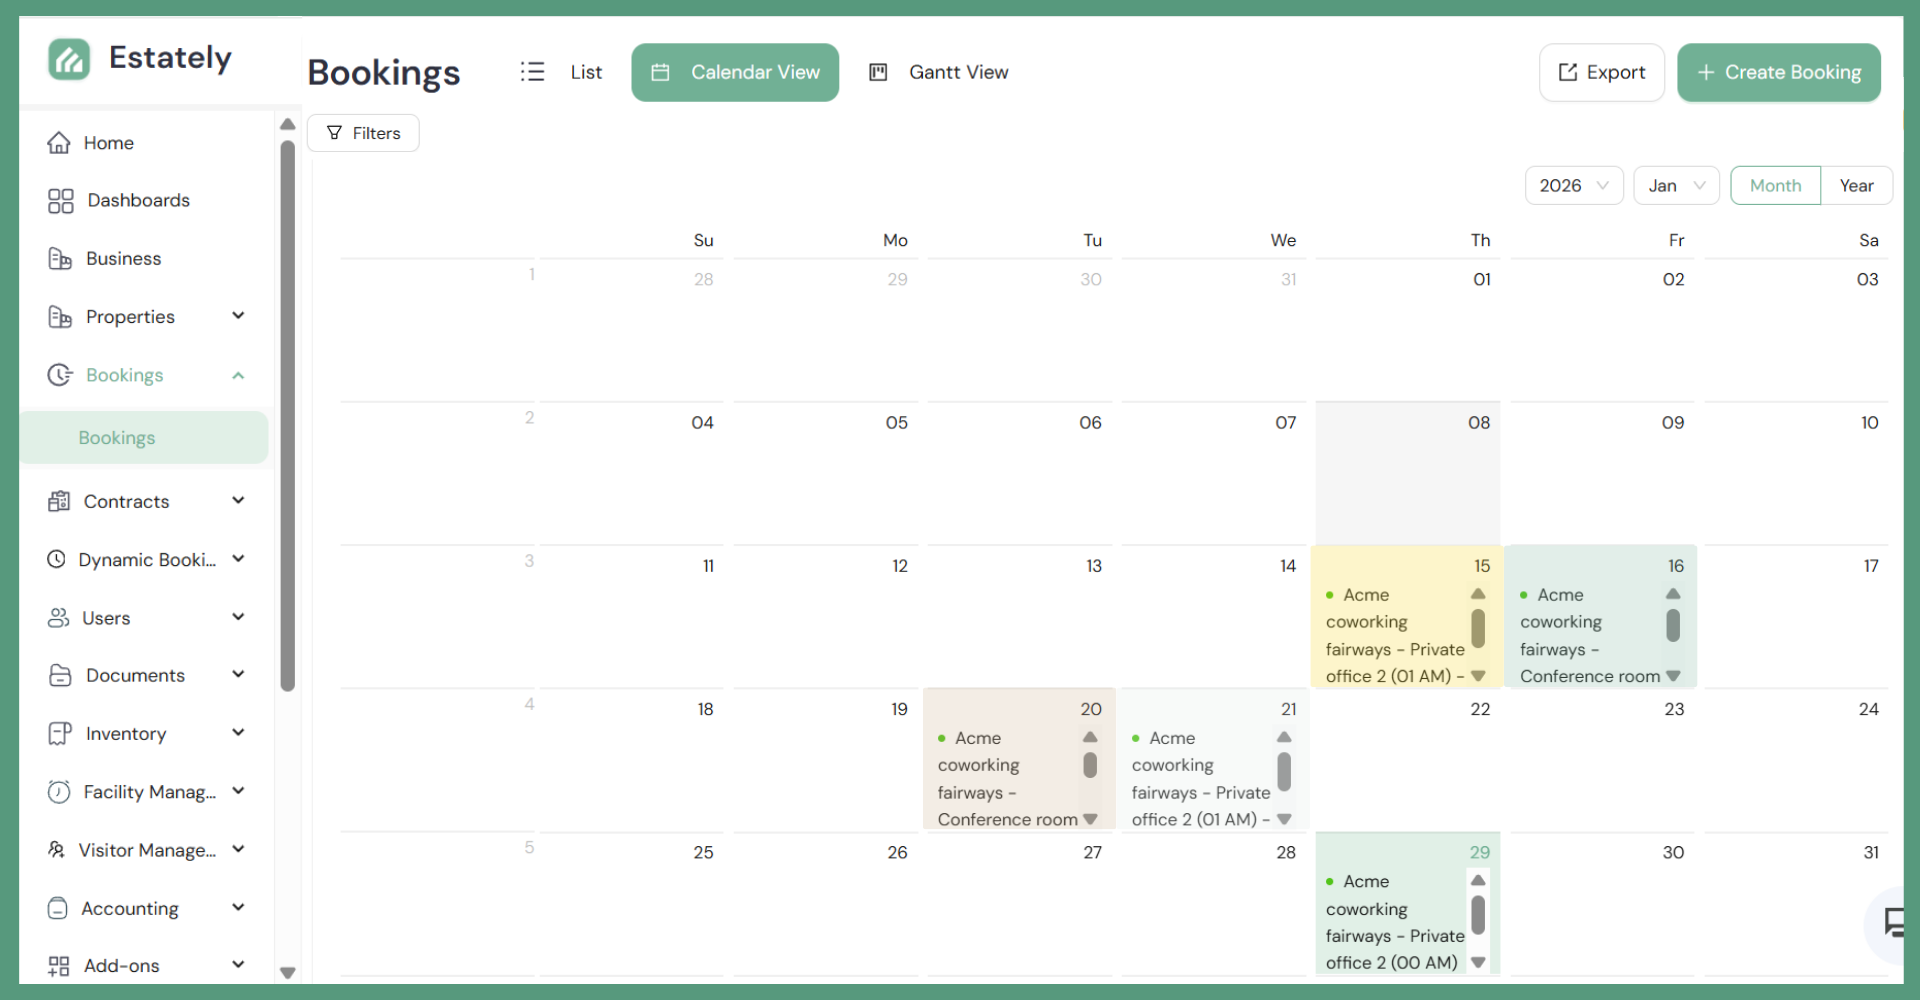
Calendar View
A date-grid calendar layout. Best for a high-level occupancy overview of a given week or month, spotting open slots during live customer enquiry calls, and managing multi-day bookings where row-based lists become harder to read.
Gantt View
A horizontal bar timeline showing booking durations side by side. Best for complex scheduling environments, identifying back-to-back bookings and gaps between reservations (useful for scheduling cleaning or setup time), and presenting occupancy visually to management.

Step 7: Managing Bookings with the Actions Menu
Every booking row ends with a three-dot (···) Actions menu — the control panel for individual reservations. From here your team can Confirm a pending booking, Cancel a reservation, Edit the booking period or unit assignment, View full details including the pricing breakdown, and Generate an Invoice directly to the linked customer.
This menu keeps the dashboard clean and uncluttered while still giving complete control. The invoice generation action hooks directly into Estately's Billing module — confirmed bookings become invoices in one click, with all pricing data already populated from the configured price rules.
A Booking Ecosystem That Works for You
The Estately Booking Module is a tightly integrated property booking ecosystem that connects pricing rules, unit availability, customer records, and billing into one seamless workflow. By following this guide — configuring Charge Periods and Prices , mastering the dashboard views, and building clean daily habits around the status lifecycle, you can run a professional, scalable booking operation without spreadsheets or manual reconciliation.
That is the real value of all-in-one booking software for real estate: less time managing tools and more time serving customers. Whether you are managing conference rooms at a single coworking space or private offices across a multi-building portfolio, Estately gives you the visibility and control to do it well.
Ready to get started? Visit www.estately.io or reach out to the team at Business@estately.io to book a personalized demo.